Do you think love is complicated? Try to have a long-distance relationship with a guy in a different country in a different time zone.
It was not only about the distance; I had a lengthy application process waiting for me after marrying him. I am talking about the application process needed to get a visa and travel. In my case, it happened to be a guy working in the US
My husband is on H1B Visa, which means I get an H4 dependent visa.
How to get an H4 Visa? What documents are required? And how do I face the interview?
I had so many questions. Fear of the unknown lurked in the shadows.
I am sure you do too if you are applying for an H4. Let me help you with those questions now that I have the answers and have successfully moved to the US with my husband.
What is an H4 Visa?
The H4 visa is issued to the immediate family members of H visa (H1B, H2A, H2B, and H3 visa) holders. It includes the dependants: spouse and children who are aged below 21 years. H4 visa holders can join the H1B holder in the US during their stay.
The good thing about this visa is that there is no cap on the number of H4 visas issued.
What can you do with an H4 immigration status?
The H4 immigration status not only grants you a temporary residence but you can also legally,
- Open a bank account
- Pursue education in the US
- Get a driver’s license
- Get a tax Id (ITIN)
- Apply for Employment Authorization
- Get a Social Security Number (SSN)
How to apply for an H4 visa?
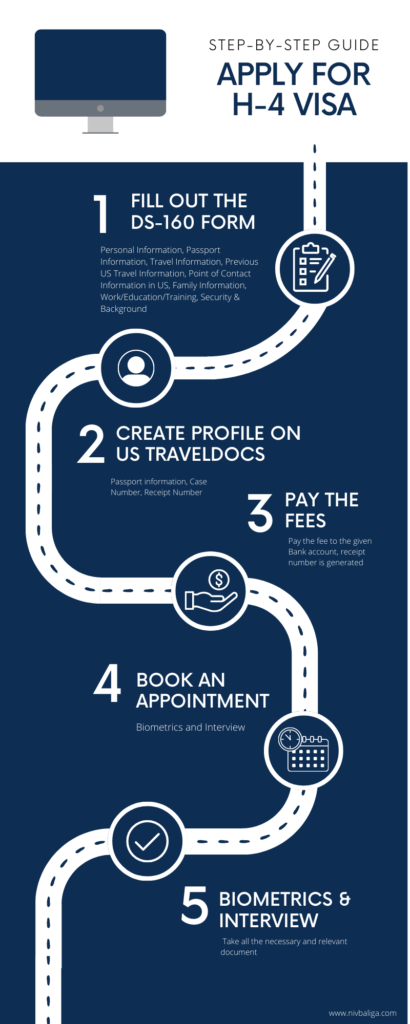
Before you apply for an H4 visa, you need to fill out something called the DS-160 form. It is a non-immigrant visa application available online. You can find it on the US Department of State Website (Consular Electronic Application center).
This form has to be filled and submitted prior to your visa appointment at the Consulate or Embassy and carry a printout of the submitted form when you attend the interview along with its confirmation page.
Note that all the information you have entered in the application is accurate if verified tallies with the connected documents. Any discrepancies may lead to the rejection of your visa application.
- Apply online by filling out the DS-160 form.
- Pay the visa fees
- Book an appointment for Biometrics and Interview.
How to fill out the DS-160 form?
The DS-160 form can take a while to fill out. So set apart time for it and don’t do it in a rush. Once you start filling, save the application number so you can get back to it in case you cannot complete it in one sitting. You have the option to “retrieve” the application by entering the application number and answering a saved security question.
Also, remember that while filling the form, the session might expire if you leave the page idle for too long. Be sure to save what you have entered every now and then so you don’t have to redo the section all over again.
Before you fill form the keep the following information ready:
- Know which consulate you are going to attend the interview.
- Keep your passport by your side as comprehensive details of your passport is required.
- Your education and work background is asked at length, so you need to keep the dates and details handy.
- Information about your spouse from the US including contact, residential address, occupation etc.
Steps to fill the DS-160 form
You can start the application by going to the site: https://ceac.state.gov/genniv/. A digital photo is not required in the application for applicants from India.
- Start by selecting the country and city where you are attending the visa interview from the drop-down list and enter the given Captcha code.
- Click on Start an application. Save this application ID. The ID can be used to Retrieve the application when your session has timed out or when you want to get back to your application in case you exit midway.
- Personal Information: This includes basic information about yourself like name, date of birth, marital status, nationality, and so on. If you have lived in the US before, you need to give the details of your former social security number in the US. Otherwise, you can simply choose the “does not apply” option. Further, you need to add your contact details like home and work addresses, phone numbers, email ID, and so on.
- Passport information: Keep your passport handy while filling out the application. You will need to add the passport number, the passport book number (if you had more than one passport), the place of issue, state, and country. All the details are straightforward.
- Travel Information: Here you add your purpose of travel, your travel dates, and specifics of your stay in the US like the address, who you will be traveling with, who is paying for your trip, etc. You will also need to add the details of your travel companion if any, adding your relationship with them and their contact information.
- Previous US Travel Information: You will then be asked if you have previously traveled to the US or not. If you did, then you need to offer details regarding your previous stay, whether you were issued a driver’s license, and what visa did you travel with (along with the visa details). You will also inform if your visa has been rejected before and the reasons for it.
- Point of Contact information in the US
If you are visiting or staying with someone in the US, you need to include those details too. The relationship with this person and their details or the details of an organization you may be connected to. It is recommended that you add at least one contact.
- Family Information:
If you have your parents or immediate relatives living in the US, this part of the form requires you to fill them out. You will also be filling in spouse details in the spouse section.
- Work/Education/Training:
The next section may prove tedious, but it is mandatory. You enter your work, education, and training information in reverse chronology. Begin with your latest occupation, the name of your employer, work address, your designation, and the duties your role entails and so on. You can “Add another” if you have worked in more than in one company, tracing back to all your prior jobs. The same goes for college and school details.
You also need to add the list of countries you visited apart from your country of residence (if it applies to you).
- Security and Background
This section involves questions like whether you have been arrested or engaged in any criminal or terrorist activity. If you choose a Yes to any of these questions you will have to appear in front of a consular officer.
This concludes all the sections of the DS-160 form. Remember to save every now and then, else you will find the session has expired and you will have to fill in the unsaved details again.
After you have completed all the sections, you have to review the information you filled in and correct any mistakes you might have made. Take your time reviewing the form as you will not be able to make any changes once you have submitted the form (You will have to fill a fresh form). After ensuring everything is correct, you can sign electronically and submit the application. You will also have to mention if someone helped you fill out the form.
You will get a confirmation as soon as you submit the form. You must print this confirmation and carry it with you for your visa interview.
Pay the Visa fees, Book an appointment
The application fee for the visa is USD 190, which is the same for all H-type visas.
- First, you create your profile on US Traveldocs website. Enter your basic information including your passport details and case number (your DS-160 number). The steps are self-guiding.
- At the end of profile creation, you will be led to the payment option. You can choose your mode of payment and pay the prescribed fee to the bank account details given to you. Ensure that you enter the correct details as the amount once transferred is not refundable.
- After payment of the fee, you may have to wait for 24 to 48 hours to get a receipt generated. You will find the receipt number if you log in to the profile you created in US travel docs. Add the receipt number and finish your profile.
- You can now book an appointment in your selected VAC in the available slots. You will be booking 2 slots: one for the biometrics and one for the interview. You will get a confirmation email with the details of your appointment including date, time and, addresses of your venues for the appointments.
Checklist of documents
This is the next important part of the process. Getting an appointment is hard enough, you need to make sure you have done everything right from your end. Here is a checklist of documents you need to carry for your visa appointment.
- Your Passport – valid with at least one blank page in it.
- Filled out DS-160 form
- Payment receipt of the visa fees
- Copy of the passport and visa of the primary H-visa holder
- Copy of I-129 form (the petition made by the primary visa holder to the USCIS for the visa)
- Copy of I-797 form (the receipt of the non-immigrant visa petition) and Labour Certification Application
- Employment letter of the primary visa holder in the US.
- Copy of previous work documents.
- Copy of tax filing in US, and salary slips.
- Original birth certificate if the applicant is a child.
- Marriage Certificate and other proofs of marriage
- Invitation to the wedding
- Photos of the wedding showing the couple and family
- Any receipts of marriage expenses
- In case of a registered marriage, then a copy of the signed affidavits, pictures of the couple signing the marriage along with witnesses to the marriage.
Facing the Interview
The sound of an interview makes many a brave person go weak in the knees. The granting of a visa is crucial for you and it is natural to be nervous. I know a lot of people even go as far as to take coaching for visa interviews. But for an H4 visa, I suggest you save that money and prepare well on your own.
Go to your venue about an hour before the time your interview is scheduled and join the line only when they call out your time slot. You do not have to wait there from early morning. A lot of people do that. It is unnecessary and a waste of your time and energy.
Know this. They just want to verify your relationship with the primary visa holder and your intention to travel. They will verify the work documents of the H-visa holder and may ask questions related to that too. They will also ask questions about your marriage, especially if you are newlywed. Is this a scam marriage to get a visa? I am sure it is not, but that’s what they want to check.
They may also ask about your qualification and work details. Remember that you can only start working with this visa after you get an Employment Authorisation Document (EAD) and not before that. You need to answer the questions accordingly.
I will give a list of possible questions they might ask during the interview. You decide the answer for yourself according to what suits you.
- Why are you traveling to the US?
- What are your qualifications?
- What do you plan to do in the US?
- Do you plan to work in the US?
- Are you currently employed?
- How will you support yourself financially?
- Where will you be living in the US?
- Where does your spouse work?
- What is his/her salary?
- How long has he/she been working for his current company?
- What kind of work does he/she do?
- What is his/her date of birth?
- How did you meet him/her?
- When did you get married?
- How long have you been married?
- Was it an arranged or love marriage?
- How long have you known each other?
My interviewer went on to ask what I like about my husband and what I don’t, and why I married him.
It is entirely up to the interviewer. They may ask a lot of questions or hardly any. Just answer them patiently. Remember they are humans and are just doing their job. Just talk freely and frankly with them. Your part of the job ends there. They will keep your passport and let you know if it is approved.
Conclusion
All that is left for you to do from here on is wait.
It may take anywhere between a week or more. It is entirely up to the Embassy. You can check the status in the US embassy site by entering your application number. I got mine within a week. You can choose to pick it up from designated places or receive it at your home address.
I hope this article helped you with everything you need to know about applying for an H-4 visa. Have I missed anything? Let me know in the comments.
Also read: